Sunday, November 10, 2013

Spicy cauliflower curry


Here's a tasty, healthy dinner (tonight!): Sauté some onions, add ginger, garlic, and hot peppers. Stir in a bunch of curry powder. Add some crushed tomatoes. Add a head of cauliflower, chopped into smallish pieces. Add whatever else you want. Add a splash of lemon juice. Cook some lentils in water with salt and curry powder, drain and stir into your curry dish. Top with parsley (or whatever else you want). I used serrano peppers and canned banana peppers (from my garden a few years ago), and I also tossed in half of a fresh tomato when I added the lentils.

I've never been a fan of cauliflower (because I don't think it tastes like anything), but that makes it the perfect vehicle for whatever favors you want to feature!

Thursday, October 31, 2013

Apple cider donuts and donut holes


You know those incredibly perfect donuts you get when you go apple picking on a farm? Well, these are just as good. Enjoy them throughout the fall months! You could use any apple cider, but nothing could possibly beat Trader Joe's Spiced Cider, which is only available for a few months each year. This recipe was inspired by this one and this one. Here's the modified recipe:

1/4 cup shortening
1 cup sugar
2 eggs
1/4 cup greek yogurt (nonfat)
1/4 cup skim milk
1 cup apple cider
3.5 cups AP flour, plus at least 1 cup reserved
2 tsp. baking powder
1 tsp. baking soda
1/2 tsp. cinnamon
1/2 tsp. salt
1/4 tsp. nutmeg
Cinnamon sugar for coating (~2/3 cup sugar+1/4 cup cinnamon)
Canola oil for frying
Start by pouring yourself a nice glass of apple cider. It's so delicious, and this is the best way to kick off this recipe.

Sunday, October 20, 2013

First frost watch!


Our kitchen currently looks like a jungle, and all the remaining plants outside are snuggled against the house!
Lemon tree, lime tree, calamondin orange tree, dwarf pomegranate, spearmint, orange mint/chocolate mint, lemon balm, serrano pepper, oregano, parsley, small container of basil, ginger (new, from grocery store ginger), rosemary (from cutting earlier in the summer), and some petunias (from cuttings). All safe and sound inside the door.
Pineapple sage, cherry tomato/petunia/parsley/Thai basil, small container of Thai basil, orange mint/peppermint, cabbage, Better Boy tomato/petunia/Italian basil/snap peas are all snuggled up against the house. Since the pineapple sage and Thai basil are already flowering, I decided to leave them outside. Mint is a little hardier, so I didn't bring it all inside. Cabbage likes to be cold. The big tomato pots are just too big! Hopefully the basil and tomato survives!
Tonight's frost is only supposed to hit "areas that tend to frost before other neighboring areas," whatever that means. But later in the week, we're expecting a real frost. I think the citrus trees are in for good, but hopefully I can give everything else a few more weeks outside!

Vogue 1241: sew along, day #8


Now it's time to hem your dress with a back vent. You can either follow the pattern instructions (which confused me) or just kinda wing it. I went with the second. To make the back vent, I pressed the back seam in one direction and made a little snip in the lining so it could come on the outside of the dress. Then I sewed narrow hems attaching the outside to the lining and top stitched the outside of the vent (sandwiching in where I snipped the lining) before actually hemming my dress. Note that if you do it this way, you'll have to make a pleat on one side of the lining as you hem. 

This probably all sounds very confusing (and it still is to me), so I hope my finished product pictures make sense to you.
Back vent, closed (note the topstitching)
Back vent - for the side on the right of the picture, I stitched a narrow hem on the outer fabric before folding it over and sewing it in place.
Back vent from the inside - for the side on the left of the picture, I just sewed a narrow hem and then sewed it in place.

Saturday, October 19, 2013

Vogue 1241: sew along, day #7


Today will be a hand sewing day. You need to hand sew a few things:
  1. Stitch below the zipper to connect the zipper to the back seam (see this post for more details - ignore the ruffle step for this dress).
  2. Hand sew the lining to the zipper. This is easiest if you baste the lining closed all the way to the neckline, press it flat, and then re-open that seam. You'll hand sew the fold to the zipper using a blind stitch (see this post for more details - ignore the ruffle step for this dress).
  3. Sew a hook and eye at the top of the zipper.
  4. Sew the front panels together to avoid wardrobe malfunctions (optional).
Now all that's left is the hem! Since this post came late, I'll post the final day of the sew along later this evening, and I'll post photos of the finished product tomorrow.
This is what the inside of your dress should look like after all your hand sewing. The zipper will be visible on the inside but not messy, and there will be no visible raw edges.
Here's what the hook and eye should look like when it is open. I clearly need to lint roller this...
Here is what the hook and eye should look like when closed. I clearly need to lint roller this...
And here's the zipper from the outside. You have to look closely to find it! That's a good thing, it's supposed to be invisible.

Wednesday, October 16, 2013

Vogue 1241: sew along, day #6


Today we'll put in the zipper and finish the back seam! Your dress is almost finished. As I mentioned in the end of yesterday's post, I went ahead and sewed the side seams before doing the back seam (step 28 in the pattern). I recommend you do the same. If you need to take your dress in or out bit, it sometimes works better to do so from the back than from the sides because the armholes won't grow or shrink in the process. That being said, for dart placement, etc. it can be better to take things in at the sides. Once you finish the back, you could still subsequently alter the sides. With this dress, I thought it would be difficult to alter at the sides because the gathered pieces are all at the sides, which makes it difficult to pin everything in place while wearing it (even thought there isn't any gathering at the side seam itself).

Try on your dress. This step should be in the pattern instructions, it's so important. Pin the back shut (it's easier to do this if you have help). Mark where the back seam/zipper should go to make the dress fit perfectly. For me, this meant a 1" seam at the top of the back (waist and above), and a less than normal 3/8" seam from my hips down. This corresponds to taking the dress in 3/4" up top and taking it out 1/4" on the bottom. Unfortunately, I got lazy and really only paid attention to the top 1" seam, so I took the dress in all the way to the bottom, resulting in a dress that fit way too tightly on my butt and legs. Once the zipper is in, you won't want to take it out to make changes! I ended up making my changes along the sides.

Unpin your dress and even out your markings. You can trim everything to a 5/8" seam if you're taking the dress in, or just remember to sew along the markings you made without worrying about the excess fabric.

Push the lining out of the way. If you stitched the back neckline all the way to the edge of the fabric, undo about 5/8" (or up to your markings) so the top of the zipper can line up with the top of the fabric.

Here, I've pushed the lining out of the way. My back neckline only goes to about an inch from the edge, so my zipper can reach the top of the fabric. The top of the zipper will ultimately be encased by that neckline seam. I saved the topstitching for last. In this photo, I've already started on the invisible zipper with the first step after ironing the zipper flat, pinning one side in place.

Tuesday, October 15, 2013

Vogue 1241: sew along, day #5


18. With right sides up, lap right upper front over left, matching centers. Baste.
If you followed my instructions and extended the base of the front panels, the width of the crossover shouldn't really change, but it could be too wide (if you extended it more than a little bit). If this happens, just chop off the pointy part to make it fit. Use the middle front panel (piece 9) to determine the correct width. Make sure you're overlapping at the center front.
Cross over the panels, matching center front. I did not extend the width of my panels when making this dress, so the points don't reach the opposite side. Your points could reach the opposite side, just make sure they don't extend the whole thing beyond the correct width. Baste them in place.
19. Pin LOWER FRONT (9) to lower edge of upper front... Pin lower front LINING to lower edge of upper front lining, right sides together... Baste between small circles. Stitch between circles, through all thicknesses.
I actually didn't baste the lower front to the upper front before adding the lower front lining. I just pinned carefully.
Pinned the center front panel. I actually didn't baste here, but I did do this before pinning on the lining panel behind it and then adjusting the pins.
Added the center front lining panel
This is what it looks like after sewing

Sunday, October 13, 2013

Vogue 1241: sew along, day #4

10. Stitch dart in UPPER FRONT LINING (6). Press fold of dart toward center.
You should be a pro at this by now! Just remember, when stitching a dart, always start at the wide part and sew all the way through the point (off the fabric). Your last few stitches should be right along the fold of the fabric. Then tie a knot at the point instead of backstitching.
Dart in lining
Dart pressed toward center
11. Staystitch...
This should be self-explanatory by now.

Saturday, October 12, 2013

Vogue 1241: sew along, day #3

5. To make dart in BACK (4), slash along solid line to square.
By slash, they just mean cut along the line. Don't cut out a wedge or anything.
5a. Staystitch back section closest to center, between upper small circle and armhole edge.
5b. Gather back section closest to the side seam, between upper small circle and middle circle.
Check out the photos under step 6 if this doesn't make sense yet. I didn't take pictures of the cutting, staystitching, and gathering since you just used those techniques yesterday.

6. Fold dart seam, right sides together, matching lower circles and solid lines, continuing to pin side back edges together, matching... Adjust gathers. Stitch... Press fold of dart and seam toward center.
When sewing this seam, the gathers might move around a little bit. To make your life easier, baste this seam, then check to make sure the gathers fall how you want them to, and then go back over with regular stitching.
In this picture, you can see where I adjusted the gathers and then sewed the seam. The dart is on the left side of this picture. There are markings on the pattern to indicate where to start angling toward the dart if it's not obvious.
Here's what the back looks like after you open it up and press. The center back is on the bottom of this picture.


7. Fuse BACK INTERFACING (5) to wrong side of back.
Again, I skipped the interfacing. It's up to you!

8. A note about reinforcing the back center seam at the bottom, where the slit will go.
I didn't do this. It really depends on your fabric and personal preference.

9. Stitch back to front at shoulders.
This should be self-explanatory, but here are some pictures for clarification.
Stitch shoulder seams
Shoulder seams open flat (this photo was actually taken at a later step... you might be able to see the lining peaking out a little under the outer fabric.

Friday, October 11, 2013

Vogue 1241: sew along day #2

Let's get to work! Today we'll assemble the upper front and side front pieces. Since these steps might involve some new skills for some of you, I'll stop there and pick up with the next steps tomorrow.

1. To make pleats in the UPPER FRONT (1) on outside, crease along lines of small circles. Bring creases to lines of large circles. Baste. Baste across upper edge. Press.
I don't really know what the first basting step is. I only basted once. See the photos below.
Fold the pleats along one line (marked with a small circle) and then adjust the fold so it rests along the line marked by the large circle. You'll be pointing your folds toward the center front when you fold them down. Pin them in place, and make sure the fold follows the line you traced onto the pattern.
After folding all your pleats, baste them in place. This means you should use the longest stitch your machine has to offer. I tend to baste about 3/8" away from the edge so I don't have to worry about the stitches showing/needing removal after I actually make a seam.

Thursday, October 10, 2013

Vogue 1241: sew along day #1

Today you should cut out your pattern pieces. I won't walk through the details of grainline, selvedges, etc. because you likely already know these things. If not, read through the last few sew alongs for links and details.

The fit of this dress is weird! Your measurements should tell you what your pattern size should be. My measurements put me around a size 10. Take a look at the finished pattern measurements (the circles with crosses in the middle on the tissue paper itself - for example, the finished bust measurement is on pattern piece 1). They are ENORMOUS (at least on the top half of your body) relative to your actual measurements. Because of this, I sized down to an 8 before cutting, and I also had to take the dress in about an inch in the back. Ultimately this was too much from my hips down, so I had to take it out at the sides along my legs. 


Do you see the circles with a cross in the middle? These list the finished garment measurements at the bust, waist, and hips. There is also a bottom finished measurement. Check them and compare to your actual measurements. You're most likely going to have way too much ease. Size down.

Monday, September 30, 2013

Vogue 1241 Sew Along Details


As promised by the end of September...

Let's start this one in about a week and a half - Thursday, October 10th. This pattern is not as hard as it might look, but it is a step above what I've presented before on this blog. The final product looks awesome! This time, I won't go through quite so many details (I'll assume you have more experience), so you should have made something wearable before (or just have a lot of confidence)! 

I would rate this pattern as easy-intermediate, with the last knit dress being very easy. The one complicated part of this pattern is just getting it to fit right. As you choose your fabric, I recommend picking out something with a little stretch. I didn't! If I make it again, I plan on using a stretch cotton or sateen, though.

So, go buy your fabric! Buy your fabric based on the fabric measurements listed for your size. REMEMBER, PATTERN SIZES ARE DIFFERENT THAN RETAIL SIZES! For comparison, my measurements put me between a 10-12 in pattern sizes. If you're between sizes, size down because this pattern does run large. 

Monday, September 23, 2013

Chili con [un poco] carne

This adapted version of my chili con carne is sure to please, and red meat lovers won't even notice what's missing! If you're a chili lover, you've probably tried using ground turkey instead of ground beef. Here, I took this idea to a new level: I stretched the ground turkey with bulgur. Honestly, I couldn't even tell the difference in the final product.

Here's the general idea: cook the bulgur with a fair amount of salt, cayenne pepper, and chili powder. Once it's cooked, brown the ground turkey and stir in the bulgur as you do. Then treat the whole mixture like it's ground beef! In general, 1 cup uncooked bulgur can substitute for 1 lb ground beef or ground turkey. In this recipe, I used ~1.2 "lbs" meat - a little over half of that was actually meat. I got this idea from Thrifty Jinxy, which contains a "stretch your sloppy joe" recipe using the same concept.


Wedding Memorial Candles

Photo by Sean Marshall Lin
Names blurred to maintain privacy.
Honoring our deceased relatives at our wedding was important to us, but we also wanted our guests to focus on the happiness of celebrating with everyone present, not who was missing. We thought candles were an appropriate choice. We had seven in total: my paternal grandfather and dog, and my husband's maternal grandparents, paternal grandfather and stepmother, and aunt. We used our wedding fonts and logo on these candles to tie in with everything else.

My bridal assistants started the procession into the church ahead of the living grandparents. They lit the candles for the four deceased immediate grandparents and carried them down the aisle so all our grandparents were part of the procession. These four candles remained lit on the alter through our wedding ceremony.

All seven candles were on display during the entire reception. They were tucked off to the side of the head table, so everyone saw them, but it wasn't as glaringly obvious as an empty chair or something.

Making these was pretty simple. You need a white candle (I got mine at Walmart for ~$3 each, but I did have to visit two different stores because each one only had ~3-4 in stock), vellum paper (I purchased this at Michael's), a printer that can handle the paper (ours kept thinking it was jammed, but my husband's parents' printer worked fine), wax paper, and a hair dryer:
  1. Print your design on vellum paper.
  2. Cut out your design. I recommend rounding the corners.
  3. Blow dry the front of the candle until it starts to feel warm and soft but isn't melting.
  4. Place your cut out design on the candle. The initial blow drying step should help hold the design in place so you only need one hand to hold it, but it won't be sticky enough to hold it alone.
  5. Wrap the whole thing in wax paper. Be careful not to budge the printout so it's not crooked.
  6. Blow dry the heck out of it! You only need to blow dry the part where your design is, but heat that area well. Make sure you don't focus the heat all on one spot for too long (if it melts to the point of dripping, the candle will end up lumpy), but make sure you move it slowly enough to get some melting.
  7. Roll the candle on a flat surface to make sure the vellum is smooth on the candle.
  8. Let the candle cool, and remove the wax paper. If there are loose corners, roll on the wax paper again and blow dry some more.
Each of our candles included the preferred name of the deceased person (like Mom-mom), the full name of the person, and their lifespan below a picture of either me or my husband with the person we were remembering.
Bridal assistants started the procession, carrying the memorial candles. Names on the candles are blurred for this public posting. Photo by Sean Marshall Lin.

Friday, September 20, 2013

Bridesmaid Gift #3: Handmade Jewelry

Photo by Sean Marshall Lin

This was by the most time consuming and expensive bridesmaid gift, but it was well worth it. If you haven't already seen the bridesmaid dresses that I designed and made from scratch, you can start here if you're interested. In addition to making the dresses (the bridesmaids paid me for the supplies), I also gave each of my bridesmaids and bridal assistants three gifts: an initialed robe (click here to view)an initialed hanger (click here to view), and a handmade jewelry set (earrings and a necklace for the bridesmaids and earrings and a bracelet for the bridal assistants and moms). 

I ordered all the supplies at Fire Mountain Gems: sterling silver for the chain and other metal parts, and Swarovski Crystal for the crystal parts. I made the necklaces and bracelets adjustable but kept in mind approximate wrist sizes. The jewelry really tied everything together and contributed to a sense of colorful sameness. My own jewelry was Swarovski, so that matched, too.

I have no jewelry-making experience, so I won't try to teach you how I did it (I learned myself by watching videos and looking at examples throughout the process), but I hope you enjoy seeing the final product.
Bridesmaids' necklaces and earrings. The message reads "I'm such a lucky bride to have you by my side." The bridal assistants have the same message, obviously.

Thursday, September 19, 2013

Bridesmaid Gift #2: Initialed Hangers

Photo by Sean Marshall Lin
This is another half-handmade gift. I gave each of my bridesmaids and bridal assistants three gifts: an initialed robe (click here to view), an initialed hanger, and a handmade jewelry set (view here).

Hopefully my attendants have something fun hanging on the hanger now. They added another personal detail to the wedding day itself, too.


Making these was incredibly simple. I ordered these satin covered hangers from Amazon. I purchased small wooden letters from Walmart that I painted silver. I attached the letters with a ribbon, and I also sewed onsmall clusters of beads to prevent straps from slipping off the hanger. I sewed on multiple clusters per side so my bridesmaids can use them for other clothing in the future. Who doesn't need another hanger?


Bead clusters I sewed on top to keep straps in place

End of summer garden update

Despite attacks now by early blight (view here) and TWO types of caterpillars (hornworms and pinworms), my tomato plants still haven't kicked the bucket. The only thing that didn't make it from the beginning of summer was my rosemary plant (still have no clue what happened to it), and I've accumulated a handful of additional plants too. Here's what I have!
Dinner tonight! (Pesto - recipe here)
Italian Basil (after the pesto hair cut), some petunia cuttings on the side, and flowering Thai basil. I couldn't keep up with all the Thai basil, there's just sooooo much, so I decided to let the small pot flower. They're pretty, and I'll try to collect the seeds.
Cherry tomatoes and petunias (Thai basil in the back)

Wednesday, September 18, 2013

Bridesmaid Gift #1: Initialed Robes


My bridesmaids and bridal assistants were great. They threw me a wonderful shower and bachelorette party and traveled from all over the Eastern and Central time zones for both my shower/bachelorette weekend and my wedding weekend. I wanted to make sure I expressed my gratitude properly.

I gave each of them three gifts, all that could be used the day of the wedding and (hopefully) in the future: a robe with their first initial, a hanger with their first initial (view here), and a homemade jewelry set (view here). The moms also got the robe and jewelry. I'll post separately on the jewelry and hangers, but I'll share the robes here.

Friday, September 13, 2013

Wedding Flowers

Photos by Sean Marshall Lin
If you haven't already seen my posts on my bridesmaid dresses, which I designed and sewed from scratch, you can view the whole sequence starting here.

Flowers weren't something that was incredibly important to me going into the wedding planning process. And they still weren't that important to me in the weeks leading up to the wedding. When I saw my wedding pictures, though, I was THRILLED with how I ended up handling my wedding flowers and centerpiece flowers!

It was important to me that all the bridesmaid bouquets were the same to tie everything together. That was my only real prerequisite. I've seen pictures from other weddings with a rainbow color scheme where the bridesmaids each have a totally different bouquet to highlight flowers and foliage in their dress color, but I'm really not a fan. It seems to lend itself to more of a hippie vibe, and I wanted the flowers to contribute to a traditional feel... uniformity, uniformity, uniformity.


How to dye silk flowers

This post has moved to my new blog at https://bobbinsofbasil.wordpress.com/2013/09/13/how-to-dye-silk-flowers/. Head over there :)

All my hand-dyed silk gladiolus (with one bunch of white, undyed
flowers for contrast)
This post goes along with my post on my wedding flowers. Since two of the colors in my rainbow color scheme don't exist in nature, and the purple was hard to match perfectly, I dyed silk gladiolus in three colors: teal, blue, and purple. 

I didn't like any of the online tutorials I found, so I came up with my own method based on several tutorials I found for faux-dyeing fabric with acrylic paint, shown in the pictures below.

**Not all acrylic paints are created equal! I had lots of success with Apple Barrel brand, but the Folk Art brand was horrible for me. The purple turned out much lighter than I wanted, despite multiple rounds of dipping.**


My method involved using acrylic paint and fabric
medium (I used Martha Stewart because it was the only
kind I could find). Mix the paint and fabric medium as
instructed by the fabric medium (mine recommended
a 2:1 ratio, I think). Add water. The more water you
add, the lighter the color will be. I'd recommend about
a 1:1 ratio of water to the rest of the mix. 

I mixed a blue and green color together
to get the perfect shade of teal.

Saturday, September 7, 2013

Stay away from my tomatoes, you obnoxious birds!

My makeshift bird shield to ripen tomatoes on the plant instead of picking early
As if it weren't bad enough that my tomatoes are suffering from early blight, all the ripe ones have been sampled by the local birds. I don't want to pick them early. They taste so much better when they're ripened fully on the vine!

The few tomatoes (or tomato halves) we did get to eat have been delicious. I'm no stranger to fresh summer tomatoes, but I honestly don't remember anything better. The one shown below was growing on a broken stem that I had splinted together. I cut off the entire piece of the vine as soon as the tomato started ripening, and I placed it in a vase of water until it was ripe. So it managed to avoid bird damage.


Here's to hoping my bird shield (a plastic fruit container like berries usually come in) keeps the birds away without trapping moisture/heat or blocking sun and that my tomato plant recovers enough from early blight to produce more deliciousness. Now I just need to buy some more berries or pre-cut fruit because I only had one container!

Friday, September 6, 2013

Battling early blight (tomatoes)

Sad tomato plant. All its bottom leaves succumbed to
the early blight disease (leaf spot).
I was so excited with the progress of my tomatoes. Really, they were green, bushy, and producing lots of new tomatoes. After my vacation, some of the bottom leaves looked a little worse for wear... they had gotten a little too wet. I trimmed off all the bottom leaves and laughed at my top heavy plant.

But then, bam, the problems started spreading up the plant. A little (a lot) internet research led me to a diagnosis as well as treatment options. My tomatoes have early blight. I probably did a lot of things wrong that led to disease susceptibility: mainly, I encouraged my tomatoes to get bushy and grow upward in the confines of their cage, allowing all the leaves to touch. I also spent way too much time touching the leaves. It rained for about 5 days straight, and it was during this time that I trimmed the bottom leaves and inspected the top ones without washing my hands.

Below, I'll describe what I've learned about early tomato blight, its prevention, its treatment, and my own experimental prevention/treatment ideas.

What is early blight?

Sunday, September 1, 2013

McCall's 6074-Summer Sew Along #2, Day #4


Note: this post comes a day early so some people who move at a faster pace can finish the dress. I posted day #3  earlier this morning.

Today we'll finish the dress! This involves hemming the armholes and the bottom of the dress. I found the instructions for the final hem unnecessarily complicated, and I'm not a fan of that type of hem either, so I hemmed it just like we've been hemming everything else on this dress: with a narrow hem.

If you're not caught up through step #8, visit day #1, day #2, and day #3 of this sew along first. We'll start at step #9.

9. For views A, B, D: Finish armhole edges of dress with a 5/8" narrow hem.

*If you're making the reversible variation of this dress, you should have already completed your armholes when you finished the "all in one facing," described here.

You already know how to do a narrow hem, but the armholes add a new level of complication. It is a fairly tight circle, which makes it difficult to stretch/not stretch the fabric as you go. It is more difficult to avoid bunching and to maintain the right amount of stretch under the arm. I'm not 100% pleased with my armhole, so I'll include some tips I thought of after the fact to make yours fit better.
Finished armhole. Mine isn't perfect, see below for tips!

McCall's 6074-Summer Sew Along #2, Day #3


Today, we'll put the gathering in the front of the dress, under the bust. This is pretty simple-you'll create a little casing for the elastic that you'll sew to the inside of the dress, and then you'll thread the elastic inside and secure it in place. We're starting at step #5 of the pattern instructions. If you're not up to that step, check out day #1 and day #2 of this sew along.

5. Press under 5/8" on long edges of CASING (3). Trim pressed-under edge to 3/8". Press under 5/8" on ends of casing. Trim pressed-under edge to 3/8".

*If you're doing the reversible variation, ignore this! You actually don't need this piece at all.

This is a really complicated way of saying you need to fold over all the edges of the fabric you cut out so there are no raw edges showing. I added an additional (optional) step here: I sewed the fabric in place so the raw edges couldn't accidentally pop out as I tried to manipulate this tiny piece. It's up to you whether you want to do this or not. It didn't add that much time and ensured a more polished looking final product.
Fold the edges and press them.
I sewed the edges in place to keep them
from moving in subsequent steps. 
The casing, with all its edges sewn in place. You don't
have to sew them down, but at least press them well.
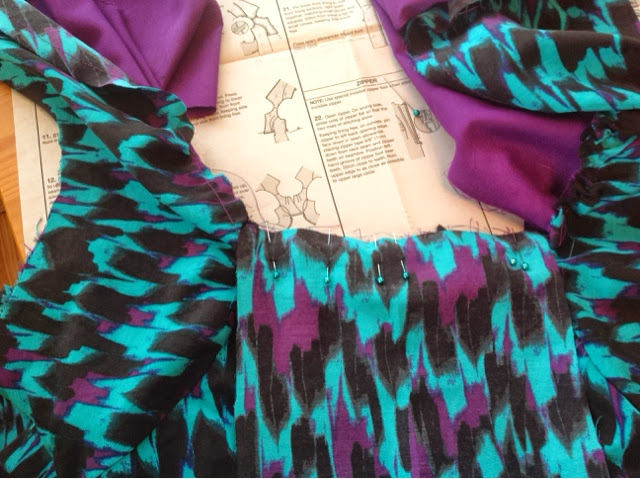
6. Pin casing to front, wrong sides together, matching centers and having long edges along placement line. Edgestitch long edges of casing. Cut a piece of elastic 4.5" long.

Again, this sounds more complicated than it is. Remember how you traced the "stitching line" onto your fabric before you started sewing? Well it basically makes a box. Put your casing (piece #3 with the edges folded (and optionally stitched) in place) into this box. Pin it there so it fits perfectly. Sew close to the edge of the box on the long sides, using your stretch stitch.

*If you're doing the reversible variation, place the inner and outer dress fronts together, with the WRONG sides of the fabric together (so you're sewing on the side of the fabric you want to show). Find your stitching line markings on both and line them up perfectly. Stitch two lines (the long sides of the box you drew).

*If you're doing the maternity variation with extra gathering, your casing piece will be longer than the box you drew. That's good. Just center it. Cut your piece of elastic to 5" instead of 4.5".

Sew the casing to the dress front along the
long edges.