

10. Stitch dart in UPPER FRONT LINING (6). Press fold of dart toward center.
You should be a pro at this by now! Just remember, when stitching a dart, always start at the wide part and sew all the way through the point (off the fabric). Your last few stitches should be right along the fold of the fabric. Then tie a knot at the point instead of backstitching.
 |
| Dart in lining |
 |
| Dart pressed toward center |
11. Staystitch...
This should be self-explanatory by now.
12. Pin SIDE FRONT LINING (7) to upper front lining at side front seam... Stitch...
Consult the picture shown on the pattern description if this doesn't make sense. You're stitching the same seam you already made on the outer dress fabric, there's just no gathering below it.
13-15. These steps should be pretty simple and make sense based on the illustrations on the pattern instructions.
 |
| This is what you end up with at the end of step 15 |
16. Pin lining to dress, right sides together, matching notches,... Stitch front and neck edges, pivoting at large circle. Stitch armhole edges. Trim seam allowances. UNDERSTITCH lining as far as possible.
I disagree with the order you're instructed to do this. I learned this the hard way - understitching one is much more difficult once both of these seams are sewn. It is more important that the understitching go all the way around the armhole than up the sides of the neckline, so stitch the armhole seam first, THEN understitch that seam completely before sewing the neckline/front seam. Do not understitch the neckline in the back of the dress - save this for the end, after you've inserted the zipper.
Understitching means you'll press the seam well and then press it toward the lining. Sew the seam allowance and lining together, about 1/4" from the original seam. You won't see this stitching from the outside of the dress, but it will be visible inside on the finished product.
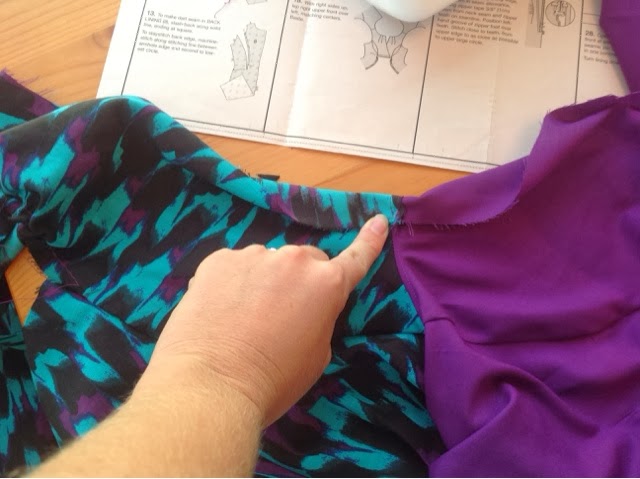
 |
| Sew the armhole seam (where my fingers are marking) first. Then press and understitch before stitching the neck seam and the front panel seam. |
 |
| This is what understitching looks like. |
17. Turn right side out. Press. Baste upper front lining to lower edge... Keeping side front and side front lining free.
See my picture if you're unclear on what things should look like.
 |
| Baste the bottom of the center front panel so you can treat the lining and outer dress fabric as a single piece. |
Here's a sneak peek of the starting point for tomorrow!
 |
| Tomorrow we'll start here, on step 18. |
No comments :
Post a Comment