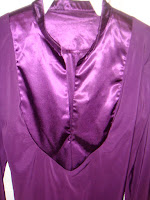
 This is the dress I made to announce my engagement at Thanksgiving to some extended family. It was my first Burda Style pattern (09/10 #109B), and it turned out great! Unfortunately, the September patterns aren't posted on the website, so I can't link to it. The only thing I changed from the pattern were two strips coming out the sides to tie in the back for shape/decoration.
It's a simple tunic look dress made from crepe-backed satin. I didn't actually use crepe-backed satin, I used a thicker regular satin and the reverse side of that fabric. And the best part of the fabric is that it has some stretch to it!
Yes, I do realize my face looks ridiculous in this picture, but I thought it was the best one of the dress.
First, I should review the pattern itself. It's awesome and simple. The instructions weren't horrible. The only big problem was that I couldn't find anywhere which pieces to cut the interfacing from, so I decided to do one side of the shiny parts (all the shiny parts are doubled inside and outside). The top front piece, as you can see, is a big V. I put interfacing on one V and not the other. However, the first step there is to sew the two Vs together and then open them up, so each V you cut makes up either the right or left side of the final V. Oops. That means only my right or left side would have interfacing while the other side would be floppy. So I decided to just add interfacing to the floppy side. Then it was way too stiff, however, and I wanted it to look good, so I set ahead to pull off the interfacing from the front of each piece (the front of the final V). I had already sewn it together and onto the front part of the dress, so this was a little tricky.
I turned the top part inside out (left picture, I hadn't attached the stand collar yet), and using my hands and scissors, I pulled it off. Problem (middle picture)! I cut a hole in my dress! Fortunately, I recovered by covering the hole with a tiny piece of interfacing and sewing inside the seam to include the little hole (right picture).
Ok, problem solved. Unfortunately, after this step, I got really into the dress and forgot to eat and take pictures. I attached the collar, etc., sewed the ties onto the front piece of dress, sewed the pockets to the front and back, sewed the front and back together, closed the pockets, and added the bottom satin strip. Then I started to feel dizzy and realized it was about 4pm, and I hadn't eaten anything all day and had to get into work! Oops, grabbed a snack, took these pictures (below of a close up of the pockets and of the full dress sans sleeves), and then got to work on the sleeves.
The sleeves were pretty simple, but I ran out of matching thread and had to add the buttons/buttonholes the next day. Unfortunately, I didn't get any pictures of me from the back actually wearing the dress, but I posted it hanging up. Here's the final finished product (with the best one actually on me being the one at the top of this post):


Nice colour of the dress! The dress too ofcourse! Also the one you made for your mom!
ReplyDelete