Today, we'll start sewing! Make sure you also have your iron ready. Today is the most involved day of sewing. By the end of the day, the waistband will be complete. Attaching the skirt is actually really easy. We'll do that tomorrow.
First, make sure your sewing machine is ready for your fabric type. Sometimes when working with thinner, flowier fabric than usual, you need to adjust your machine's tension. Practice on some scrap fabric. If you think the stitching looks funny, consult the manual for your sewing machine for instructions on how to adjust the tension.
We'll start with the waistband:
 |
Make sure you have the right type of needles. Smaller
numbers correspond to thinner fabric. |
 |
Fold the bow pieces lengthwise, right sides of the fabric
together (you'll sew them inside out). Pin along the open
edges. You want the pins to be perpendicular to the edge of
the fabric so you can sew right over them. Do this for both
waistband pieces. Leave the straight edge (the one that
doesn't end in a point) open. |
 |
Leaving the straight edge open, sew along the edge of the
bow piece with a 3/8" seam. Your sewing machine should
have markings to indicate how wide your seam is (you can
see the numbers on mine, the 15 and 20 are mm, and the 5/8,
etc. are inches). This is the only seam that will be 3/8" (it's
pretty narrow). |
 |
When you finish sewing the long edge, stop 3/8" from the
corner. Make sure your needle is DOWN in the fabric, and
raise the presser foot. |
 |
Turn the bow piece so you can sew along the point with a
3/8" seam. Sew to the end. Repeat on the other bow piece. |
 |
| Press the seams of the bow pieces flat. |
 |
Make a little snip at the corner of each bow piece. Don't
cut through the stitching. Stop just before you reach
the stitching. |
 |
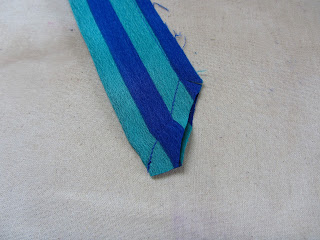
| Cut the tip of the bow piece so it is straight. |
 |
Press the seam OPEN. IT helps to turn the whole thing
on its side so the seam is up. This will make two folds
in the waistband that you don't want, but it will make it
easier to press once it's right-side out. |
 |
Turn the bow pieces right-side out. A chopstick or a
knitting needle could be really helpful here. Just make sure
not to tear the fabric or poke through any seams. Press
these bow pieces nice and flat, and set them aside for a
few minutes. |
 |
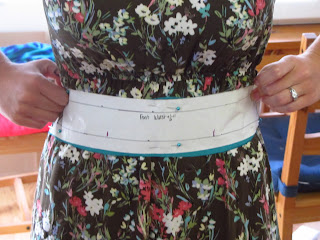
Measure the distance between your two dart points on
your front and back. I'm holding my pattern piece/fabric up
to my waist to demonstrate. On the front, these points are
at your waist, as if you drew a line straight down from your
nipple. On your back, these points are at your waist
as if you drew a straight line down from your collarbones.
These points are where the darts in the skirt will go.
It's easiest to make these marks before assembling the
waistband. |
 |
Fold your pattern piece in half. Mark your dart points.
Use your pattern pieces to mark the actual fabric with a
fabric pen (the pen will be temporary and will wash off
easily or even fade away in a few days). Also mark the
center front. |
 |
Make sure you know which fabric pieces are the front of
the waistband and which are the back. Make sure you can
also distinguish top and bottom (the top tapers in a TINY
bit, 1/8" on each side). You should mark your dart points
on the bottom to help you make this distinction. In this
picture, I have the top facing downward. |
 |
Starting with the front and back waistband lining pieces (the
inside of the waistband), put the right sides of the fabric
together. Make sure the bottoms line up and tops line up.
With the front piece below the back piece, top sides up, pin
togethe the left side. Sew this seam with a 5/8" allowance.
This is the seam allowance we'll use. **If you're matching
stripes or patterns on the fabric, make sure you're using the
correct pieces for the lining and the right pieces for the
visible part of the skirt. |
 |
Set aside the lining and the front piece of the waistband.
Lay the waistband back piece in front of you, making sure
the top is up, bottom is down. Take the longer bow piece,
and place it on top of the waistband back piece, with the
straight edge matching the left edge of the waistband back
piece. Make sure the pointy side of the bow piece points
toward the bottom. Pin the bow piece to the waistband back
piece in the middle, leaving 5/8" above and 5/8" below.
*If you have stripes, etc. here, make sure you match it
correctly* |
 |
Pin the shorter bow piece to the right side of the back
waistband piece, with the pointy end of the bow piece
facing toward the bottom. Sew these pieces on with a
3/8" seam. THIS IS A NARROW SEAM because it will
be hidden in the final product. |
 |
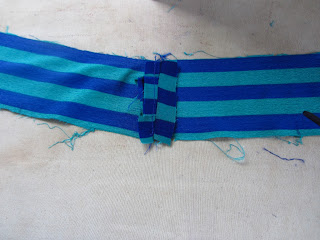
This is what you should have on each side—a narrow seam
connecting the bow pieces to the waistband. Now, place the
front waistband piece ON TOP of the back. Pin down on the
left side (when the front is on top). The bow piece will be
sandwiched between the two waistband pieces. Make sure
it is flat. |
 |
Sew along the seam you just pinned with a 5/8" seam.
**The waistband is flipped in this picture (the bottom
of the waistband is on the top of the photo). You're sewing
the seam you just pinned, which is on the right when
oriented the other way. It's just easier to sew this way.** |
Now, bring your waistband lining and waistband+bow pieces to the ironing board. You're going to press the seams open. Below is the sequence I use to press the seams open. If you go straight for the kill (pressing the seams open without first pressing them to each side, etc.), then they often don't end up as flat and nice. This is a pretty easy sequence that will make things look polished in the end:
 |
Lay the waistband lining piece on top of the waistband+bow
piece, right sides together. Make sure not to confuse the top
and bottom! Line up the tops and pin in place. |
 |
When pinning in place, make sure to line up the side seams
(the ones you just sewed and pressed open) and not to
catch the bow piece that is sandwiched between the front
and back waistband. |
 |
Leave 5/8" open at each end. Do not sew past that last pin!
Note that you can see my dart placement marking in
this picture. |
Now, sew along the top of the waistband with a 5/8" seam. Take care not to sew on top of the bow piece, and make sure to leave 5/8" at either end (this is to attach the zipper later). After sewing, press open using the same series as before. Then, fold it along this seam. Pressing open helps the fold lie flat after you're finished. Press along the fold to create a nice, flat, top seam:
 |
| Press this new seam open. |
 |
Fold along the new seam. Press the whole thing nice and flat.
Now, the lining and visible part of the waistband are one
piece. All that's left to attach are the skirt pieces, and then
it's almost all finishing! It's pretty obvious which side
faces in--the side without the long bow pieces coming out. |
 |
Go ahead and try on your waistband to make
sure it fits! |


No comments :
Post a Comment