Ready to make your own skirt? Whether you're a newbie or experienced seamster, this skirt is sure to please. Use hashtag #easybreezydress on your favorite social media outlet to share your progress and boast about the final product. I'm trying pinterest's "image hover" feature for your pinning purposes. Let me know what you think and whether you prefer the button up top.
Today we'll just prep the "pattern," prep the fabric, and make sure you have all your supplies ready. If you want to cut the fabric as soon as you prep it, just wait until tomorrow to do it all.
I mentioned that if your fabric isn't quite wide enough for what I recommended, there are a few things you can do. You can A) Shorten the skirt, B) Lower where the skirt sits, or C) Get rid of some of the body of the skirt. I've written a separate post on how to do each of these three things. You can view it here!
While you prepare your skirt pattern, pre-wash your fabric if you haven't already. Some flowy fabrics can't go in the dryer, so be sure to check that before pre-washing. You should wash your fabric exactly as you would wash the skirt in the future.
Calculate your total circle radius for your skirt. If you ignored my calculations for purchasing your fabric, that's ok (except not really because I originally calculated as if we'd have the waist opening for a FULL CIRCLE, oops). You don't need to worry about the letters (A,B,C,Z). Just look at the length from the middle of the circle to the end. The total circle radius is your desired skirt length (L) plus what's necessary for your waist and extra for the pleats.
Circle radius=L+[(waist+12)/π].
 |
| Your pattern will be the part of the circle in gray. |
Add a hem allowance to this number. We'll do a rolled hem, but we'll do a fresh trim before hemming, so add 3/4" to your circle radius. You'll cut out this much and then trim off about a half inch before hemming.
Make sure your paper is a a square of at least that size. If not, tape multiple pieces of paper together with scotch tape. **NOTE: I cut out my paper pattern before fixing the measurements (I was still assuming a full circle). Don't pay attention to the actual measurements on my circle based on the measuring tape. I ended up fixing things after cutting out the fabric (mostly by making the skirt much shorter than I had planned)**
Then follow these simple instructions:
Then follow these simple instructions:
 |
Cut your paper to be a perfect square with each side
length the number you just calculated(circle radius+3/4"). Use regular scissors for this. |
 |
| Fold your square along the diagonal. Decide which point will be the circle center (it doesn't matter, just pick one and mark it somehow). |
 |
| Measure from that point along the diagonal fold to the same length you've been using (circle radius+3/4"). Make a little slit with the scissors. |
 |
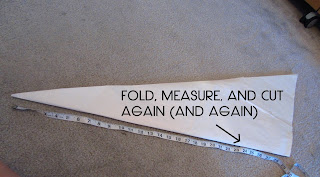
| Fold this triangle looking paper in half AGAIN. Again, measure to the same length (circle radius+3/4"), and make a little cut. Repeat this one more time. |
 |
| Open up your folded paper down to just the original fold. Do your little scissor cuts follow a curve? Mark in between these slits to fill in the quarter circle. Cut it out. |
 |
| Unfold. You'll have a quarter circle with the correct radius. Thrilling, isn't it? |
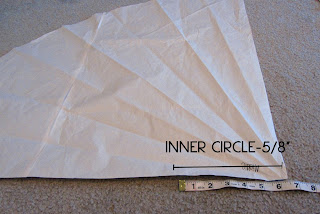
Next, you need another number, which was already part of your original circle radius—(waist+12)/π. This number is the inner circle radius. SUBTRACT 5/8" from this number for seam allowance.
 |
| Fold along the diagonal like before, make your slits for the smaller circle, fold again, etc. Cut out the inner circle. Ta-da! You have your skirt pattern! |
Divide your waist measurement in two: the front and the back. Measure each separately and make sure they add up to your total waist circumference. Add
 |
| DRAW two rectangles on your paper that are 1.5"x(each new number). Don't draw right on the edge; you'll need that space for seam allowance. Revision: change 1/2" to 5/8" |
 |
| Draw a vertical line 1/8"in on each side. **If you increased your half inch above, you'll have to increase this 1/8" by half that amount, too.** |
 |
| Draw a dot on one corner and a dot on the opposite side at the vertical line. Connect the dots. |
 |
| Measure out 5/8" all the way around this piece to add a seam allowance. Cut out these pieces. You should now have the waistband pieces in paper form. |
 |
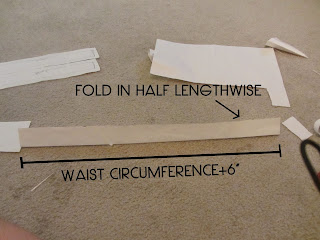
| Draw a rectangle that is 3.75" tall, with the width equal to your waist circumference+6." Fold in half lengthwise. |
 |
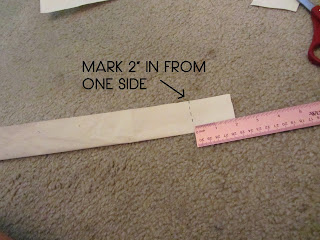
| Mark 2" from one side. |
 |
| Connect the corners; cut along this line. |
 |
| Open up your bow piece! There will be one on each side. We'll shorten one side to make it sit off to the side on your waist. |
Now you have a pattern! Don't worry about the pleats on the skirt pieces. We'll build them in when we get to that part.
Since I've already posted a pretty comprehensive sew-along, I'm not going to reinvent the wheel here. I'll reference previous posts for some beginner skills like fabric prep, etc.
Is your fabric washed and dried yet? Press it flat with your iron. Use the iron settings recommended for the type of fabric you have; a quick google search can help you out. When in doubt, start with low heat and work up on a small area of the fabric to make sure you don't ruin it.
Is your fabric washed and dried yet? Press it flat with your iron. Use the iron settings recommended for the type of fabric you have; a quick google search can help you out. When in doubt, start with low heat and work up on a small area of the fabric to make sure you don't ruin it.
Next, find the grainline and the crossgrain. These terms have to do with the direction the threads go in the fabric. Are these words foreign to you? Visit the first days of the Coffee Date Dress sew-along for a detailed description and useful links for preparing your fabric. If your grain is skewed, there are instructions to fix it. This is especially important for a flowy skirt, since the direction of the fabric controls how the skirt will fall.
Ok, your fabric is ready, your "pattern" is ready... and I might have lied a little bit. We'll wait until tomorrow to cut the actual fabric itself. I find the pattern prep and fabric prep always takes longer than I anticipate, and the pattern prep is where the most mistakes happen. Sleep on it and double check your pattern tomorrow, when we'll cut out the fabric.
To prepare, make sure you have all the sewing supplies you need. As with the coffee date dress sew-along, you'll need a sewing machine, seam ripper, fabric scissors, measuring tape, a fabric pen or tailor's chalk, pins, a needle for hand sewing, and a functional iron. See the details of what each of these are and what they're used for here.
To prepare, make sure you have all the sewing supplies you need. As with the coffee date dress sew-along, you'll need a sewing machine, seam ripper, fabric scissors, measuring tape, a fabric pen or tailor's chalk, pins, a needle for hand sewing, and a functional iron. See the details of what each of these are and what they're used for here.


No comments :
Post a Comment