Wednesday, July 31, 2013

Easy breezy skirt sew along: What to do if your fabric isn't wide enough


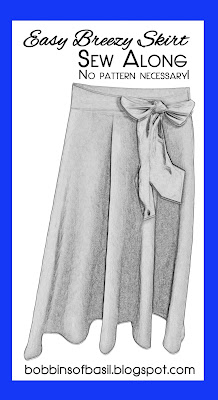
This is a tangent from the easy breezy skirt sew along (use hashtag #easybreezyskirt on twitter, instagram, etc.). We'll design the pattern and prep the fabric tomorrow, but I just wanted to give a quick update on how to modify things if your fabric isn't wide enough.

I mentioned that you'll need fabric with a minimum width of Width=((waist+12)/π)+L)*√2 (L=your desired skirt length). Ideally, you want at least 9" extra for your waistband. 

If you can only find 44" wide fabric, this might be tricky.


Here are three alterations you can make alone or in combination to the formula and pattern:

  1. Shorten your skirt. Chances are you don't want to make it too much shorter than you planned, but see if an inch or so changes things and if that's a sacrifice you're willing to make. This is the easiest change.
  2. Lower the waistband of your skirt. Instead of making this skirt come up to your waist, wear it a little lower on your abdomen. This involves two changes. First, figure out where you'll wear your skirt. Measure around that point and substitute that in for the waist circumference in the pattern creation, for both the circle and the waistband pieces (which we'll design tomorrow). Then, adjust the length based on where you're wearing the skirt. For example, if you're wearing the skirt 4" lower (closer to your hips), then shorten the length by 4" to make the hem reach your desired length. The inner circle will be a little bit bigger, but the total necessary fabric width will be smaller.
  3. Decrease the amount of body in the skirt. If you look at the drawing of the skirt, you might be able to see pleats. There are two in the front and two in the back. I somewhat arbitrarily decided that I would add 12" total in the pleats. Well, you could take that number way down, all the way to 4," without totally changing the look of the skirt. Change the number 12 in the formulas to be a little bit smaller. Play around until you get it to fit.
Once you get your skirt to fit to the fabric width, you still have to deal with the waistband. The reason we need 9" of extra width is to fit the bow pieces—tomorrow you'll see that one is your waist circumference+6" long, and it's 3.75" tall (and there are two, hence 9" total). Unless you bought that much extra fabric in addition to your required length, you don't have a continuous piece of fabric that long. Make sure you have a fair amount of extra fabric (~20"), and I'll show you how to adjust your pattern layout to make the waistband work when we cut the fabric on Friday.

I messed up in my pattern design, so I ended up having to make these changes AFTER cutting the fabric out. I couldn't do #3, and I didn't want to do #2, so I ended up making a much shorter skirt than I had planned! Well, I'll wear it at the beach! With foresight, though, you can use a combination of these three things. Just figure out which numbers give you a necessary width that is smaller than your fabric width!
Root pruning

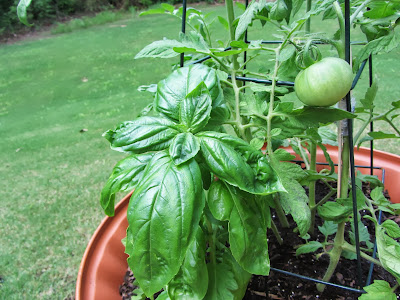
Root Pruning Herbs | Bobbins of Basil

Most of my herbs this year outgrew their pots within about a month. Even those that I transplanted to new pots only weeks before had filled them. How did I know? Well, the signs were pretty obvious:

Friday, July 26, 2013

Bridesmaid Dresses: the final product


In case you're arriving at this post from a link on pinterest or elsewhere, it's part of a series in which I documented the creation of bridesmaid dresses for my wedding. In total, it was about an 18 month project (from asking the bridesmaids to getting married). To see the whole bridesmaid dress creation sequence (dress design, dress assembly, and the finishing touches/fine details), go back to the first post in this series (click here). Here is the finished product!

Our wedding was fairly traditional. We got married in a church and had the reception at a country club. The dresses were perfect for our wedding, and I just LOVED the vivid colors. They turned out really well, and they looked especially good on the dance floor for twirling with their full skirts!

I asked each girl to incorporate a silk gladiolus flower into her hair (separate post coming on these flowers). I asked them to wear their hair in an updo because 1) late June is hot!, and 2) I wanted the criss-crossed back to show. The bridesmaid flowers were white roses with gladiolus in their color incorporated for a pop of color. I asked everyone to just wear silver strappy shoes of their choice, and to be honest, I wasn't looking at anyone's shoes! I had six bridesmaids and two bridal assistants. I'll have a separate post on my bridal assistants. I asked them to wear periwinkle/indigo to go with the color scheme.

Please feel free to pin or share these pictures, but make sure our awesome photographer's name remains associated in the captions. Our photographer was excellent, and you can check out his other work here.

Bobbins of Basil | Bridesmaid Dresses made from scratch. Visit for more photos and details. Photo Credit: Sean Marshall Lin #Rainbow wedding color scheme
Photo Credit: Sean Marshall Lin
Bobbins of Basil | Bridesmaid Dresses made from scratch. Visit for more photos and details. Photo Credit: Sean Marshall Lin #Rainbow wedding color scheme
Photo Credit: Sean Marshall Lin

Thursday, July 25, 2013

Announcing THREE upcoming sew alongs


By popular demand (and because I think it's really fun), I'll be hosting some more sew-alongs later this summer and early fall. I've decided to do three different items, each of increasing difficulty, but all very easy. The second two require patterns, so keep your eye out for sales at the major (read expensive) fabric stores and online at http://voguepatterns.mccall.com.

Speaking of sales, there's one now! $1.99 for McCall's and $3.99 for Vogue! The McCall's one ends Friday, though, so fill place your orders!

First, the easy breezy skirt. This skirt will be based on your measurements and does not require a pattern! Woohoo! Once you've made it, it's also REALLY easy to change to make lots of unique skirts and dresses from the same base. It has a side zipper, a waistband, and a bow.

Bobbins of Basil BEGINNER Sew Along, begins August 1st, 2013
Sew Along #1, starting 8/1/13
We'll start cutting this one on Thursday, August 1st. So you have a week to get your fabric. If you're behind, don't worry. This is a short, practice sew-along for any newbies that will last less than a week. Someone more experienced could easily bang it out in a day. I'll try to break it into small, manageable pieces. We started with this post (click here).

Wednesday, July 24, 2013

Bridesmaid Dresses: Finishing Touches


This is the fourth of five posts documenting the creation of my bridesmaid dresses. Click here to go to the start.

There were a lot of finer details involved in these dresses than the casual observer might notice. These dresses have a lightly gathered round neckline, a full circle skirt with a rolled hem, a slightly dropped waist (1" below the natural waist), an invisible zipper with a hook and eye closure at the top, a straight skirt lining for modesty purposes (the bodice is also lined), interlocking straps, and a criss-crossed pleated waistband. 

Working in reverse order from that list...

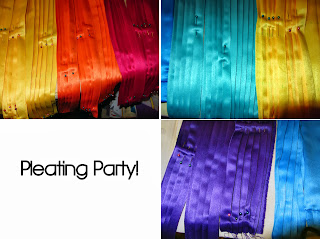
The waistbands were a PAIN to make. After making one, I realized I didn't have enough time (or hands) in my life to pleat them all. Hence, a pressing party. I enlisted the help of some lab members (6 extra hands and one extra iron!) who helped me bang out the remaining five in about 4 hours. Each waistband has four pieces—the base (the flat back of the waistband), a back piece that is pleated horizontally, and two front pieces, each pleated horizontally and then criss-crossed. Having two people work on pressing one piece saved many burnt fingers—this fabric conducts heat very well, and trying to hold a pleat in place with one hand while ironing with the other was not fun.

Bridesmaid dress details | Bobbins of Basil
Pleating party

Tuesday, July 23, 2013

Assembling my bridesmaid dresses


This is the third post in a series on my bridesmaid dresses. Click here to see the first and link to the rest :)

I put together the bodice and lining and then double checked each girl's measurements before attaching the skirt. Since the skirt was all one piece (except where I had cut the circle to insert the zipper and back seam), any bodice alterations after attaching the skirt required removal of the skirt. The skirt did not have side seams. I saved attaching the straps for my bridal shower weekend, when everyone flew in and could try on their dresses. Only one dress required major alterations (removing the skirt and zipper), which wasn't too bad.

Here is a short sequence of dress assembly pictures!
Assembly of the bridesmaid dresses | Bobbins of Basil
Bodices sewn, straps pinned into place, back pinned
shut, lining complete except back; yellow, pink (red),
purple, and blue dresses.

Monday, July 22, 2013

Bridesmaid Dresses


I've fallen off the radar for the past year as I prepared for my wedding and completed my PhD. Now I can share all the things I created for the wedding since they're not a secret anymore!

First, the most exciting and biggest project of all: the bridesmaid dresses. Since this was an 18 month project, I'll break it into smaller posts over the next few days :)
Please note: the photos shown above were assembled from our professional wedding photos.
Photo credit: Sean Marshall Lin

The Color Scheme
Our wedding was fairly traditional. We got married in a church and had the reception at a country club. I used a rainbow color scheme for my wedding. Everything--invitations, place cards, memorial candles, programs, etc. followed this color scheme, but the table linens were all white. The flowers also turned out great--the girls had white roses with gladiolus in their respective colors. Some of the colors didn't exist naturally, so I dyed silk flowers (another post to follow) to match, and the florist incorporated them in with the live white roses.

I chose the rainbow color scheme for two reasons: 1) I just love colors and couldn't imagine choosing only one, and 2) My parents had a rainbow color scheme for their wedding.

Designing bridesmaid dresses


Since the bridesmaid dresses were an 18 month project, I've broken this into smaller posts. This is the second, here's the first (summary) post!

Choosing the Dress Design
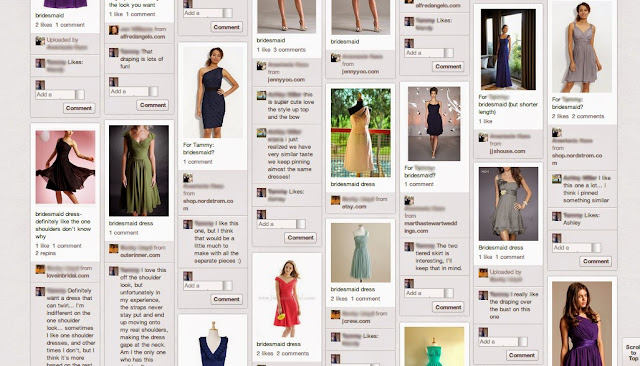
I modified the typical choose a bridesmaid dress routine—bride chooses a bunch of dresses she likes, bridesmaids tell her which they like/dislike, new ones enter the field, bridesmaids try them on and email each other pictures, etc. I decided to use pinterest for this part of the procedure. I created a shared pinterest board between all my bridesmaids and asked them to pin their favorite dresses with minimal guidance from me. They knew I was looking for short/knee length and not strapless. I did have two other features in mind, but I didn't want to sway them before I got a sense of their tastes. We commented on them, etc., until I felt ready to design a dress. I feel like this was a really good way to choose a dress, and even if you're not designing your own, it would be a good way to make sure you don't choose something anyone hates/that you do choose something your girls will like.

How to choose a bridesmaid dress | Bobbins of Basil
How to choose a bridesmaid dress

Friday, July 19, 2013

Chocolate Mint Fudge, fresh from the garden

Chocolate Mint Fudge | Bobbins of Basil
I've been looking for ideas to use all my mint, which will hopefully take off in the next few days after its root pruning session. I've already made chocolate mint ice cream, had lots of minty water, and made a ginger-mint simple syrup for our soda stream. I eyed up the sweetened condensed milk in the pantry and went for fudge!

Here's the incredibly simple recipe: 
3 cups chocolate chips
1 can sweetened condensed milk (14oz, I used fat free)
~1/4-1/2 cup chopped mint

Melt the chocolate and condensed milk in a crock pot or on a double boiler. As soon as most of the chocolate has melted, cut the heat and keep stirring until smooth. Stir in the chopped mint, and pour into a foil-lined, greased 9x9 pan. Refrigerate ~1 hour. Flip the foil onto a cutting board to cut slices of fudge. Enjoy!

Wednesday, July 17, 2013

Rosemary Fries


So there's this place in Cleveland. BEST FRIES YOU'LL EVER EAT (it's called The Greenhouse Tavern). They are so incredibly delicious that we went ahead and registered for a mini deep fryer just so we could bring the phenomenal taste into our own kitchen. Well, we wanted to make these fries among other things...

Rosemary Fries | Bobbins of Basil

A new garden!


I'm back! After a year's blogging hiatus, I've returned with a newly minted PhD, a new address, a new wedding band, a new garden, a bunch of new kitchen gadgets, and lots of new domestic pursuits.

Gardening with Bobbins of Basil | bobbinsofbasil.blogspot.com
2013 Patio Garden | Bobbins of Basil
I have a TON of wedding stuff to post, but I'm waiting on the final versions of my photographer's pictures because they are a far superior showcase of my wedding creativity. Coming soon: bridesmaid dresses, centerpieces, "guest book," invitations, save the dates, a tutorial on dyeing flowers, homemade jewelry, bridesmaid gifts, and a rehearsal dress.


For now, though, I'd like to show off my new patio garden.

I partially moved to the new place right before Memorial Day, and we bought some small plants at Walmart. After the wedding, my lemon and lime trees arrived along with my mystery plant I'd been keeping at lab. We also added a parsley plant recently (we didn't get one with the initial batch).